My Home Server/Lab Show and Tell
My Home Server
..Home Lab or Home Server?
Why not both? The terms “home lab” and “home server” are loosely defined and somewhat interchangeable. I have 1 server which performs both functions for me but I’d consider it roughly 80% home server and 20% home lab in it’s use. My home network and internet (and this blog!) are 100% dependent on this one server so there is very much a production aspect to it - thus the heavy 80% “home server” usage. I frequently spend weeks or months away from this hobby and during that time I just need things to work. With the other 20% of usage I may just want a linux or Windows VM to mess around with. For example, I may want to learn more about a VPN and I’ll tinker with it on it’s own “lab” VM. Once I get comfortable with something I’m learning, I may decide to put it into “production” and incorporate it as a core component of my home server/network. But in short, I’ll generally refer to my “home server” in this post since I mostly cover the productionized aspects.
Brief Background
My home server journey began long before Raspberry Pi’s and small form-factor computers were a thing. This was the early 2000’s.. an era of using discarded enterprise servers from local businesses - servers which were obnoxiously loud, heavy, large and power-hungry. But there was just something so cool and fascinating about these machines that captured the geek in middle school me and my high school brother (who supplied the servers via various Summer jobs). Combine these machines with the earlier good ole days of the internet and there was just something magical and fascinating about being able to host a website in your parent’s basement for the world to see. But even internet aside, it was oddly enjoyable to run a Windows 2000 Domain Controller for our family of five’s home network despite how excessive and obnoxious that was. One could argue that perhaps I should have focused more on making friends and socializing during my middle and high school years (and taken it easier on my parent’s power bill) but that’s just what being a geek is all about, I guess.
After I went off to college and began living on my own and then starting my career in tech (who would have thought!), my interest in running home servers faded away. But now many years later during a recent months-long period between jobs, I decided to repurpose my old PC as a dedicated home server. I did this because I wanted to brush up on some hands-on tech skills for my job search and I also needed to pick up a daytime hobby to keep me and my mind busy while I was without a day job. And boy did I pick (back) up my old hobby.
All of the enjoyment and interest I had as a kid in middle school came right back out as an adult tinkering with a home server again. And now, decades after my first foray into the hobby, it’s never been easier to run a home server/lab and you’re able to do much more with much less because of advancements in compute power and tech like hardware virtualization and the proliferation of open source software. There’s also even more practical reasons for running a home server with the continued degradation of the internet with ads, tracking and general privacy concerns. And even though I’ve had a regular day job for over a year now, I’m keeping this hobby alive as I continue to tinker with and expand my home server functionality. The rest of this post goes into detail on my current home server setup with a little background and learnings sprinkled in.
Throwback Photos
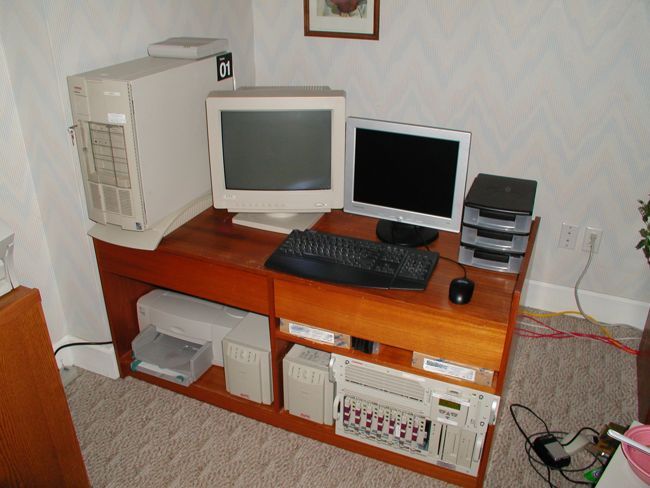
Server "rack" in my parent's basement circa early 2000's
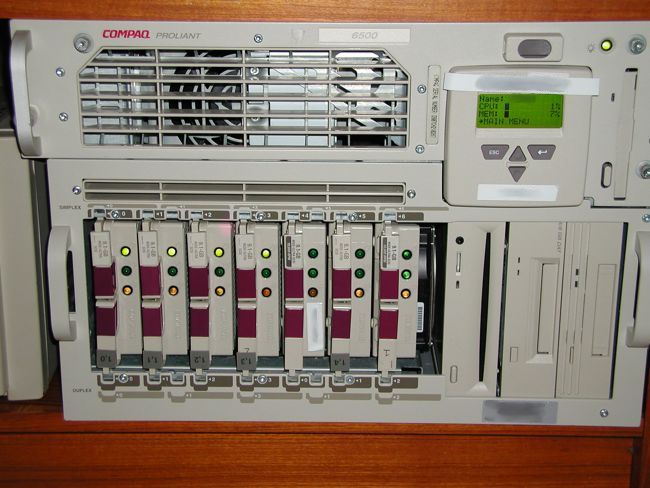
The behemoth server - Compaq ProLiant 6500, 7U rackmount with 4xPentium III Xeon 500Mhz CPUs with 7 SCSI drives
Current Home Server
Hardware
- ASUS X99-A LGA 2011-v3 motherboard
- Intel Xeon E5-2660 v4 14 core CPU
- 32GB DDR4 2133Mhz RAM
- Samsung 990 Evo Plus 4TB NVMe
- 2x WD Gold 12 TB HDDs
- 1 port 1Gbps onboard LAN
- 1 port 2.5Gbps NIC
- 4 port 1Gbps NIC
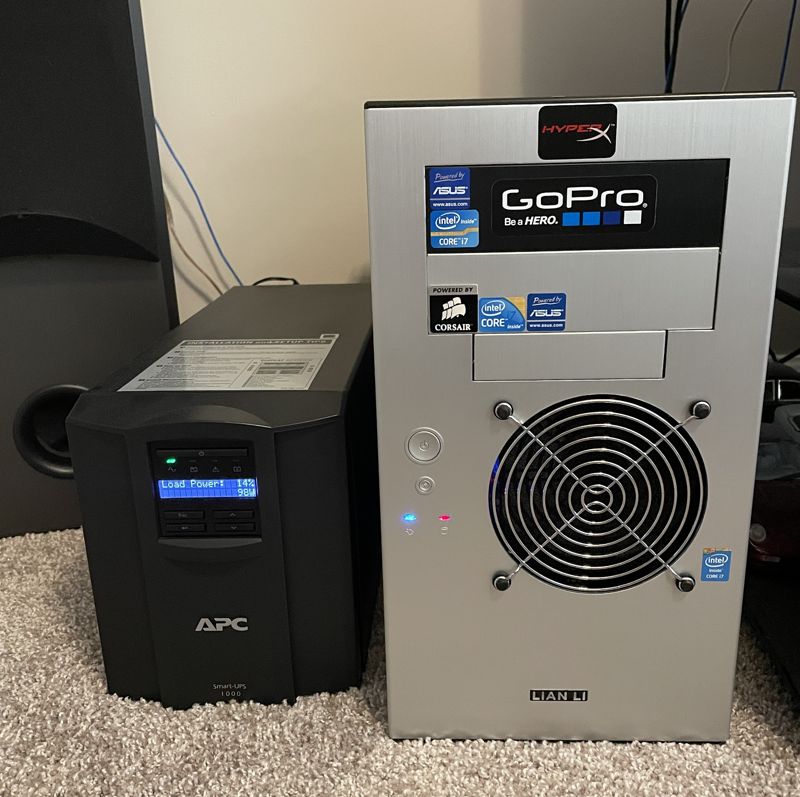
- APC Smart-UPS 1000 UPS (1000VA/700W)
I built a PC in 2014 on the Intel X99 platform with a Core i7 5820K 6 core CPU. This was a HEDT (high-end desktop) consumer platform for enthusiasts (which I certainly was!). It was a great platform and I got around 6 years out of it before upgrading. After a few of years gathering dust in my closet it got its new life as my current home server. While rebuilding it as a server, the enthusiast platform paid a nice dividend (nearly 10 years later!) when I learned that I could upgrade the original i7 5820K 6 core CPU with a newer generation Xeon server CPU from eBay for around $50. It turns out that Intel had even gone out of their way to specifically enable support for these newer Xeons on the X99 platform in 2016, 2 years after the platform’s initial release. So I dropped in a Xeon E5-2660 v4 processor with 14 cores which also brought a nice upgrade from 22nm to 14nm lithography. I got 8 more cores AND a decrease of about 10-15 watts in idle power consumption - both excellent upgrades for server use. Unfortunately, Intel dropped any further support for Xeon CPUs on consumer platforms after X99. But that just makes this old platform that much more cool and worthy of continued usage as a home server.
Running alongside the server is an APC uninterruptable power supply (UPS) which is a used business-grade UPS I got from eBay which provides well over an hour of runtime for the server, modem and wireless LAN. There’s a great linux utility (apcupsd) which can be configured to shutdown a server based on various configurable parameters like elapsed power-out time, battery time remaining, etc. Any sort of extended power outage is going to result in the server shutting down (cleanly) but more importantly, the line-interactive UPS is going to provide clean power and prevent brown outs/power blips from wreaking havoc on my server.
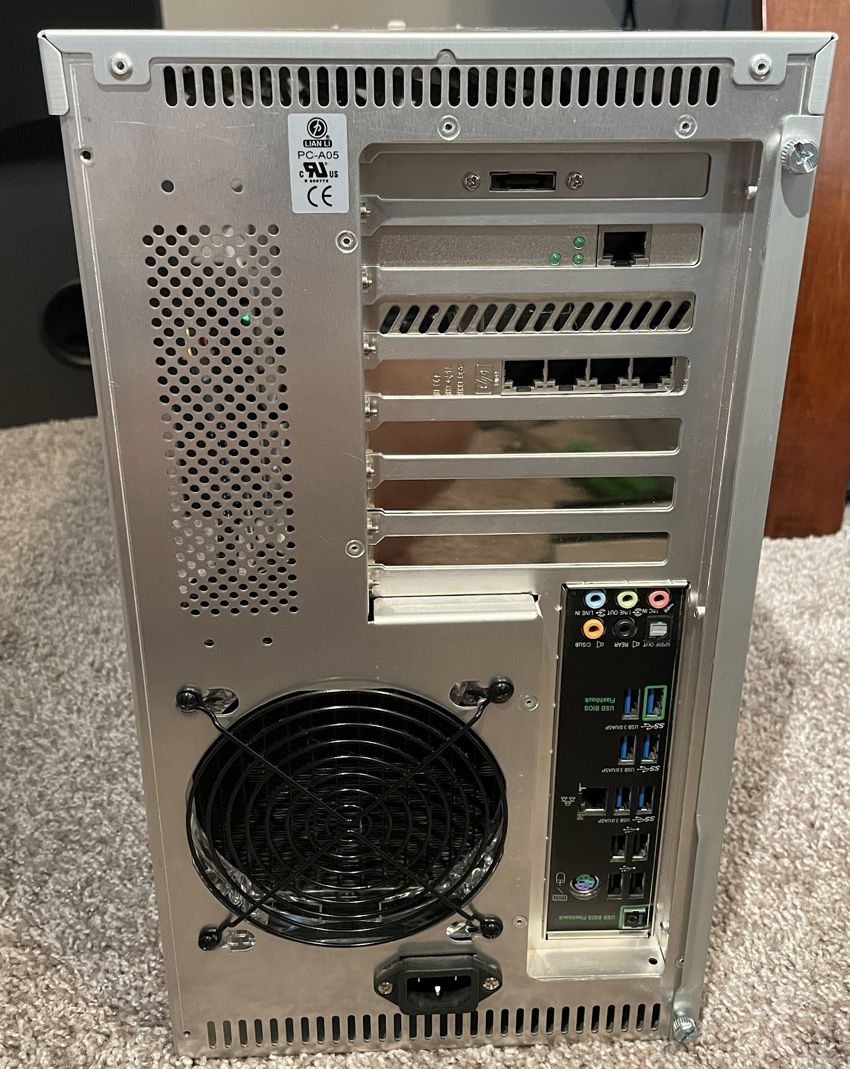
Rear of server showing the NICs and onboard LAN
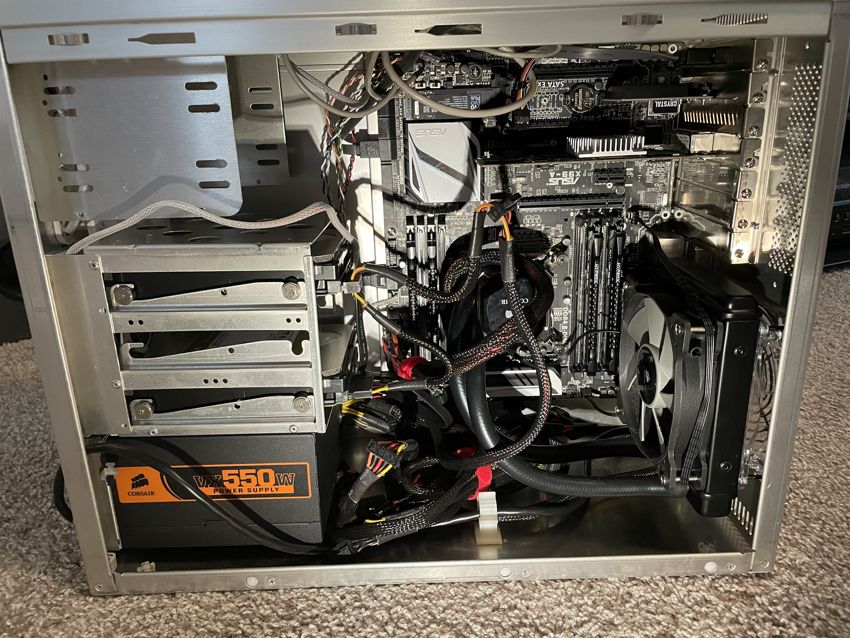
Inside view of the server
Virtualization
- Proxmox bare-metal virtualization platform
I had some past experience with VMWare ESXi so I went with that platform initially, but this was around the time that Broadcom decided to do it’s thing.. so I quickly pivoted to Proxmox and I’ve been very pleased with it as a platform since.
I run an Ubuntu Server VM for each primary function of the server (described more in the Functions section) and divvy up disk space, RAM and CPU cores as needed.

Proxmox console showing server utilization (click for full size)
Networking
Depending on how many devices you have and how crazy you want to get with network segmentation, the networking component of a home server or lab can be one of the most useful functions as well as one of the more complicated ones. It isn’t all that hard to build out if you have a solid understanding of networking fundamentals and subnetting but otherwise it can take a good bit of time to learn to get fully comfortable with. My networking layout has matured over time from a mostly flat layout (with only the wireless LAN being in it’s own subnet) to a very segmented layout. The more segmented your network, the more control your router/firewall has over your network traffic. The downside being complexity.

Physical and Logical Network Layout (click for full size)
This may look complicated but here’s the basic jist of what’s going on in the diagram if you aren’t familiar with networking in a virtualized environment:
- There’s one server and a handful of other physical devices
- This server has 3 physical network cards with multiple ports to connect to other physical devices (like my wireless router, internet modem, etc.)
- Because of “virtualization”, there are many different “virtual” networks within the virtualized server environment that each virtual machine (VM) can be connected to. These virtual networks (in Proxmox) are a Linux construct and can be referred to as network bridges or virtual switches. These mimic real-world physical networks but aren’t actually physical in nature and are just defined in software. These virtual switches/networks can be directly “connected” to physical networks but they don’t have to be if a connection to other physical devices isn’t necessary - maybe one virtual server just needs to talk to another virtual server and nothing else - or perhaps a server can indirectly communicate with the outside world via another server in a network which IS connected to a physical network.
- At the core of all of this is OPNsense which is the router and firewall - I explain a bit more on that in the Firewall + Router section
Functions
The whole point of a server is to have it “serve” aka do useful stuff!
- Firewall + Router
- DNS
- VPN
- Web Proxy
- Storage/NAS
- Hosting
- Backup
Firewall + Router
- OPNsense
The firewall + router is a core component of any network and that’s no different for my home network. My modem is plugged directly into a network port on my server and this port is mapped directly to a VM running OPNsense which handles all routing and firewalling for my network. For example, wireless client traffic comes in via my wireless access point which is also connected directly to another network port on my server. This network port is mapped directly to the OPNsense VM and OPNsense serves as the network gateway to connect these wireless clients to the rest of my network. The firewall also permits/blocks this traffic depending on it’s attributes based on rules. Wireless traffic is treated differently than traffic from my hardwired PC as wireless is less secure and thus trusted less. After using a home server setup in this way for a while, the idea of ever connecting all my home devices directly to my ISP’s modem again (via cable or wireless) has become entirely gross to me.
Years ago I had some experience using Untangle as a home network firewall and was going to use it again but I was frustrated to see that over the years it had become less friendly for personal use and had also integrated a bunch of cloud-based garbage. Instead of running an older version of it, I switched over to OPNsense. Fortunately, what I learned previously about running a firewall with Untangle was very applicable to OPNsense as well. OPNsense is just slightly less friendly/straightforward than Untangle was but once I spent some time with it I became comfortable doing everything I needed to and I’ve been very happy with it. It’s interface is quite nice and modern.
Depending on your network topology, your firewall rules may be pretty simple or quite complicated and extensive like mine. Features like aliases to statically map IP addresses to friendly names and floating rules that span interfaces are helpful and fortunately OPNsense has both. It also has a great live traffic view to easily debug why your rule isn’t working like you hoped!
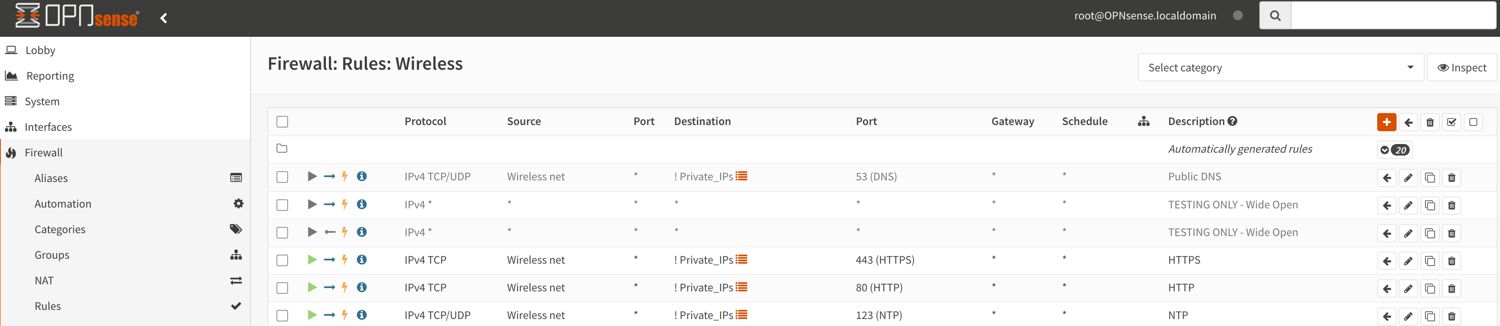
Simple example of OPNsense UI with a couple rules for my wireless network segment (click for full size)
There’s more for me to explore with my server’s network/security/firewall functions by going beyond a simple layer 3 firewall. I want to look into potential IDS/IPS/WAF solutions that work well in a home server/lab environment.
DNS
- AdGuard Home
Ads/Tracking/Malware
I had heard about Pi-hole years ago and was intrigued by the idea of significantly reducing ads and tracking via DNS but I never got around to seriously trying it out. Now with a home server it was the perfect time to explore a local DNS server to take advantage of similar functionality. I wanted something that offered pretty robust ad/tracking blocking capabilities off the shelf (or at least with easy-to-subscribe-to third party lists). AdGuard seemed to fit the bill and it was super easy to install and configure and I’ve been happy with it.
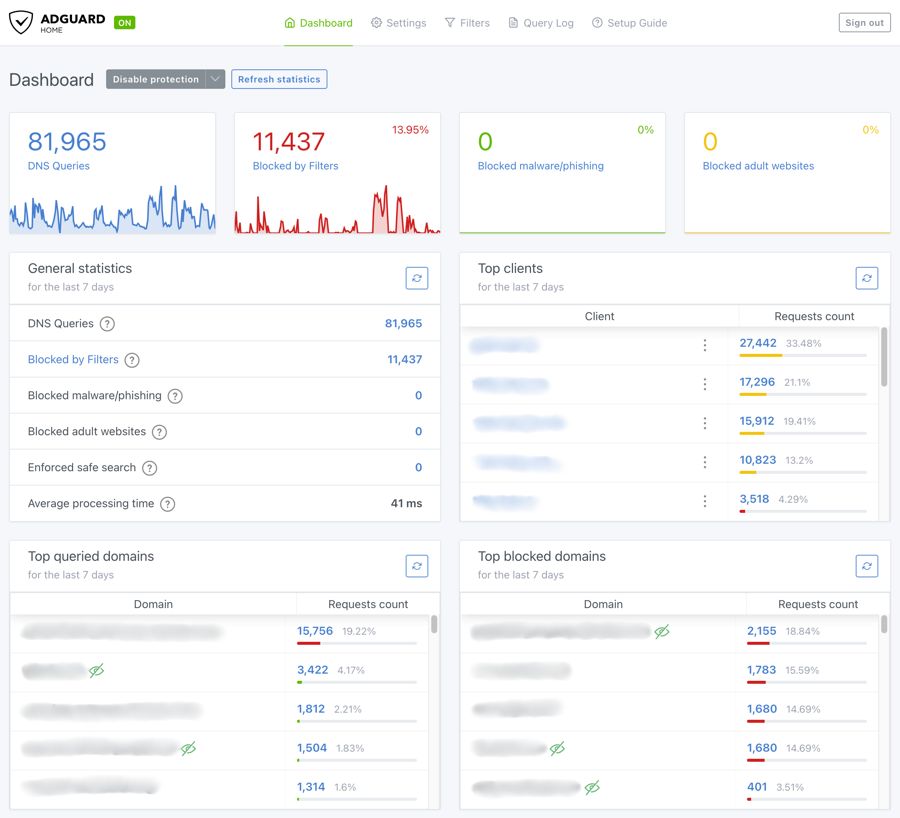
AdGuard Home Console
DNS Privacy
In addition to blocking ads/tracking/malware, I also want to take advantage of encrypted DNS to prevent my ISP and others from snooping on my DNS queries. By configuring my local DNS server to only use an upstream resolver with DoH (DNS over HTTPS) and configuring clients on my network to use my local DNS server I easily get network-wide encrypted outbound DNS by setting it up once from a central location (the caveat is that there is still unencrypted DNS traffic on my home network itself, but I trust my home network so it’s not a concern for me. I’m only concerned with DNS queries once they leave my network and hit the internet.) Additionally, my firewall doesn’t permit any traditional unencrypted port 53 DNS traffic from hitting the internet. Without centralized DNS on my network I’d have to configure encrypted DNS on each client independently which may not even be possible with some clients. In the end, my ISP sees zero traditional unencrypted port 53 DNS traffic - all it sees is encrypted port 443 HTTPS traffic which contains my usual web traffic with DNS requests also mixed in.
VPN
- OpenVPN with associated PKI (a separate CA server) to do VPN certificates
VPN is all about privacy and one can easily find a VPN provider and install a client to use on a single device. The benefit of a VPN on a home network is that, similar to DNS, you can configure the VPN centrally and other devices on the network can easily benefit without needing to be VPN-aware. Although the networking/routing aspects of doing this are a good bit more challenging than, say, centralized DNS. A VPN gateway can be configured to connect to an external VPN provider and then clients on the network can leverage this gateway to route their traffic out through the VPN to the VPN provider. Additionally, your VPN gateway can connect to another LAN over the internet via a VPN server on the other LAN - this could be used to play LAN games or perhaps to remote into a family members network/PC to troubleshoot an issue.
I’ve tinkered a little bit with connecting my VPN server to another remote LAN but I still have more tinkering and building to do with regards to my VPN function, though. I would like to implement the VPN gateway -> VPN provider capability so I can have certain clients route all their outbound traffic through the VPN, exclusively, for increased privacy from invasive ad-related tracking.
Web Proxy
- Squid
I route most of my web traffic on my home network through Squid web proxy. I initially had plans to filter traffic to block ad/tracking related requests but I’m content with my DNS filtering for that capability for now and trying to do it via Squid seems like a much larger hassle. There is probably little to no reason to keep using a web proxy on my network but there’s no impact to my internet performance so it’s staying put for now. Caching is one potential benefit but with HTTPS so prevalent these days that’s not as useful - and to be honest, I’m not even sure if Squid does much caching out of the box. I really should spend some more time playing with Squid..
Storage/NAS
- Samsung 990 Evo Plus 4TB NVMe for Proxmox host storage (Debian base, VM disks)
- 2 WD Gold 12TB HDDs in a ZFS mirrored pool (to protect against single disk failure) for NAS as well as additional Proxmox storage for VM backups and ISOs
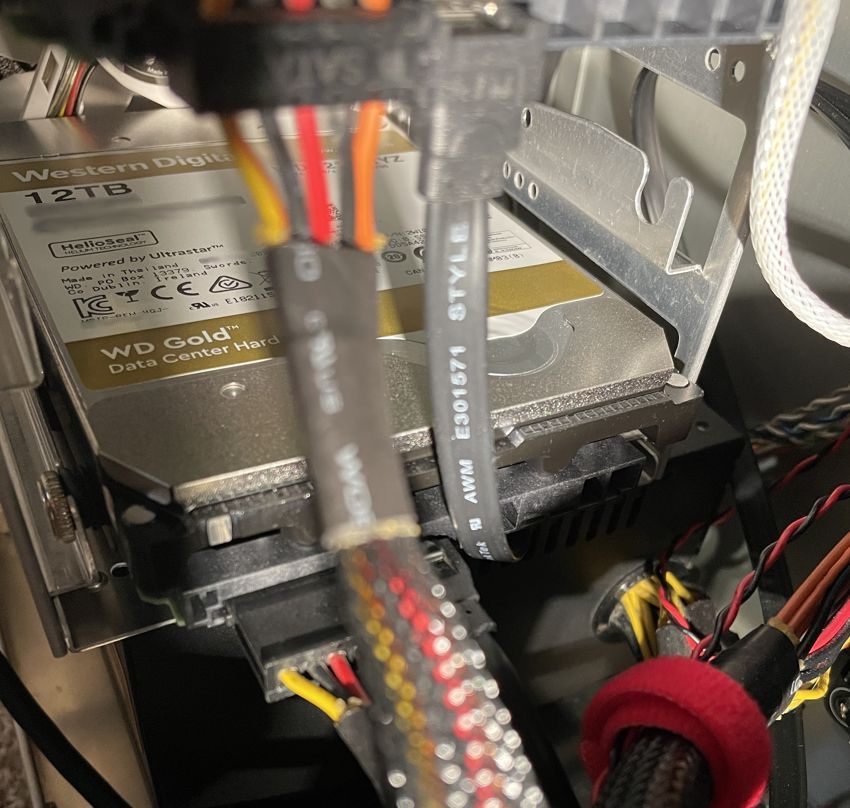
WD Gold 12TB - lovely drives
Proxmox Storage Configuration
One of the only gripes I have with proxmox is during the installation (when I upgraded my boot drive to the current 4TB 990 Evo) I was frustrated to learn that Proxmox requires the ENTIRE disk during installation. 4TB is way more than I need for Proxmox and VMs and so I want to use most of this space as super fast NVMe NAS storage to supplement the much slower 12TB of mirrored storage with the HDDs. I ended up setting up this NVMe NAS space after installation but whenever I reinstall Proxmox itself, I’ll need to get all my data off the drive which sucks (If the server had another NVMe slot I’d just get a cheap smaller drive for Proxmox to do whatever it wants with, but oh well).
The below lsblk cmd shows the disks on my server and the Proxmox storage allocations:
- NVMe0 drive
- 111.7GB for the root Debian host itself for Proxmox
- 265.8GB for VM disks
- A large 3.2TB NAS partition with the remaining storage on the NVMe
- sda/b 12TB (10.9TB usable) drives serve as NAS for my network as well as additional Proxmox storage for VM backups and ISOs
# lsblk

NAME                         MAJ:MIN RM   SIZE RO TYPE  MOUNTPOINTS
sda                            8:0    0  10.9T  0 disk
├─sda1                         8:1    0  10.9T  0 part
└─sda9                         8:9    0     8M  0 part
sdb                            8:16   0  10.9T  0 disk
├─sdb1                         8:17   0  10.9T  0 part
└─sdb9                         8:25   0     8M  0 part
nvme0n1                      259:0    0   3.6T  0 disk
├─nvme0n1p1                  259:1    0  1007K  0 part
├─nvme0n1p2                  259:2    0     1G  0 part  /boot/efi
├─nvme0n1p3                  259:3    0   399G  0 part
│ ├─pve-root                 252:0    0 111.7G  0 lvm   /
│ ├─pve-data_tmeta           252:1    0   2.7G  0 lvm
│ │ └─pve-data-tpool         252:3    0 265.8G  0 lvm
│ │   ├─pve-data             252:4    0 265.8G  1 lvm
│ │   ├─pve-vm--100--disk--0 252:5    0    24G  0 lvm
│ │   ├─pve-vm--104--disk--0 252:6    0    16G  0 lvm
| |   ...... <redacted for brevity> ......
│ └─pve-data_tdata           252:2    0 265.8G  0 lvm
│   └─pve-data-tpool         252:3    0 265.8G  0 lvm
│     ├─pve-data             252:4    0 265.8G  1 lvm
│     ├─pve-vm--100--disk--0 252:5    0    24G  0 lvm
│     ├─pve-vm--104--disk--0 252:6    0    16G  0 lvm
| |   ...... <redacted for brevity> ......
└─nvme0n1p4                  259:4    0   3.2T  0 part
  └─dm_crypt-nvme            252:23   0   3.2T  0 crypt /mnt/nvmeNAS
File Share/NAS
- Samba (SMB protocol) on the Proxmox base OS itself
File sharing is a basic function for any network. I have a Samba share for the 2 WD Gold 12TB HDDs as well as for the 3TB+ partition on the NVMe drive for performance sensitive file sharing.
Initially, my plan was to run a dedicated VM to handle my network file storage but after doing some disk benchmarking I saw some minor performance implications by using the disks through a VM versus using them as raw disks on the Proxmox host itself so I skipped the VM option. It’s a little messy to have one of my server functions handled within the Proxmox host environment instead of contained within a VM but the file sharing setup and configuration is minimal (just requires Samba and it’s config file) so I’ve stuck with it. And it’s the only function not handled within a VM. I need to revisit the disk benchmarking that I did, though, as some later testing with new drives may not have shown any performance hit through a VM.
Hosting
Self-hosting things on the internet with your own hardware is fun - just make sure you know what you’re doing and keep internet hosted things in their own network segment with little to (ideally) zero connectivity to the rest of your network.
Because of dynamic IPs on residential internet connections, you’ll likely need to implement a solution to keep your DNS record(s) up to date with your current IP address. Namecheap makes this super simple as all you have to do is enable dynamic DNS for your domain and then use a bash script to curl an endpoint regularly with cron.
Website
This blog itself is self-hosted on my server via a VM in it’s own isolated subnet. It runs ngninx to host this super simple static site which is built with Hugo.
Game server
I also occasionally run a public game server on a dedicated VM in it’s own isolated subnet.
Backups
This is more of a secondary function but it’s quite important. I don’t want either a computer failure or more catastrophic event like a fire/flood, etc. to wipe out all the time and effort I’ve put into creating this home server environment. Fortunately, Proxmox has a robust backup capability to backup individual VMs. Periodically, those backups can be stored on the cloud or somewhere else as an offsite backup option. There would still be a decent amount of work required to rebuild a new proxmox host and it’s networking configuration but at least all of the server functions themselves could be restored easily with the VM backups. Infrastructure-as-code would be even more helpful here as well and is something I’d like to invest more time in but VM disk backups are just so cheap and easy.